As we all know, in the entire scanning and data acquisition process, besides the scanning preparation, data fitting is also crucial and often determines the productivity and output results.
Here below is a brief introduction about Align Modes:
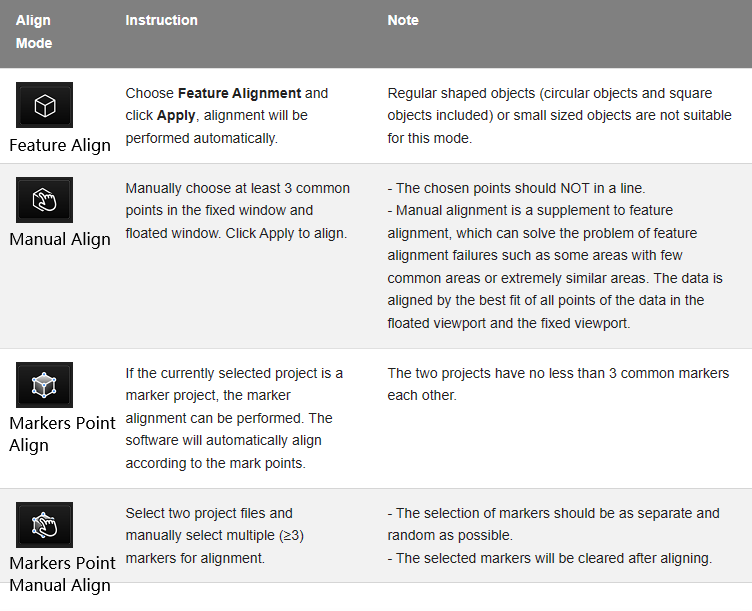
*Note: You should generate point cloud before doing align.
In this article, we will introduce a critical function in data aligning: Markers Point Manual Align.

In general, marker alignment has high accuracy and is particularly suitable for industrial scanning or scanning of special objects such as small objects, less feature objects and thin-walled parts.
The following are some situations that are suitable for using this mode (Markers Point Manual Align):
1. The scanned object is a thin-walled component with sharp edges.
2. The data of both sides of the scanned object are required.
Example:
Object:IPHONE case
Scanner:EinScan HX
Software:EXScan HX_v1.3.0.3
Operation steps
- Stick markers on/around the object
- Create 2 projects and scan
- Select the common markers on the object and manual align
Step 1. Stick markers on/around the object
FYI, make sure to stick enough markers on the turntable, and both sides of the cellphone case also need markers.
Since the cellphone case itself belongs to a thin-walled part, conventional scanning can be challenging to obtain ideal data results.
Therefore, we can paste markers on the turntable (around the cellphone case) and on both sides of the case to facilitate subsequent manual alignment.
Step 2. Create 2 projects and scan
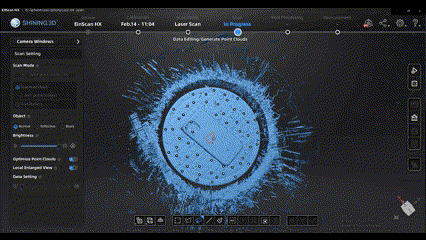
First, enter the main software interface and select the laser mode. Create a new project, select the high point distance, and start scanning.

Before scanning, check the basic settings such as brightness adjustment and scan distance control in the preview interface.
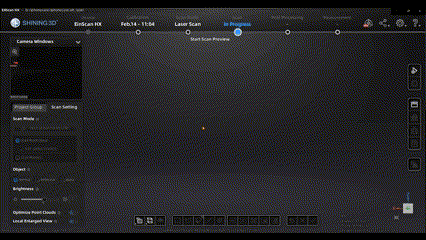
When ready, start scanning. We need to scan the data as thoroughly as possible to ensure data quality.
We can also zoom in on the relevant scanning area in real-time to observe the density of specific data.
After scanning, we can use some editing tools to edit and optimize the scan data, such as connect domain function and cutting plane tool.
Flexibly using these tools can greatly improve our efficiency in processing scan data.
(connect domain)

(cutting plane)
This is our first project, which is the scanned data corresponding to the back of the cellphone case.

Next, we flip the cellphone case over and place it with the inside facing up.
Then create a new project and repeat the scanning and data editing process just now.

(Create a new project)

(Scanning like before)
Step 3. Select the common markers on the object and manual align
In addition to the most common automatic alignment, we can also choose manual alignment to achieve the desired data results.

Here, you can see that we can choose the markers on the object to perform manual alignment.

Selecting the shared markers on the object in the two projects, at least three pairs of markers need to be selected, and then confirm the alignment to obtain a complete scan of the cellphone case with thin walls. Subsequently, packaging the data results in post-processing is complete.

If you have any questions or need further assistance, please feel free to contact us.
*Key tips
- Make sure you are using the common markers between projects to do the manual alignment.
- Markers can stick on the object or surround the object, depends on the specific situation.